Mostrando entradas con la etiqueta Ching Chou Kuik. Mostrar todas las entradas

sábado, 23 de mayo de 2020

Ching Chou Kuik: Love Parrot

Hola a todos:
Hello everyone:
Quedan unos días para que el reto de mayo de Ching Chou Kuik llegue a su fin.
There are still some days left for you to join us in the current challenge at Ching Chou Kuik challenge blog
El trabajo de inspiración de esta semana tenía que ser una shaped card (o tarjeta con forma).
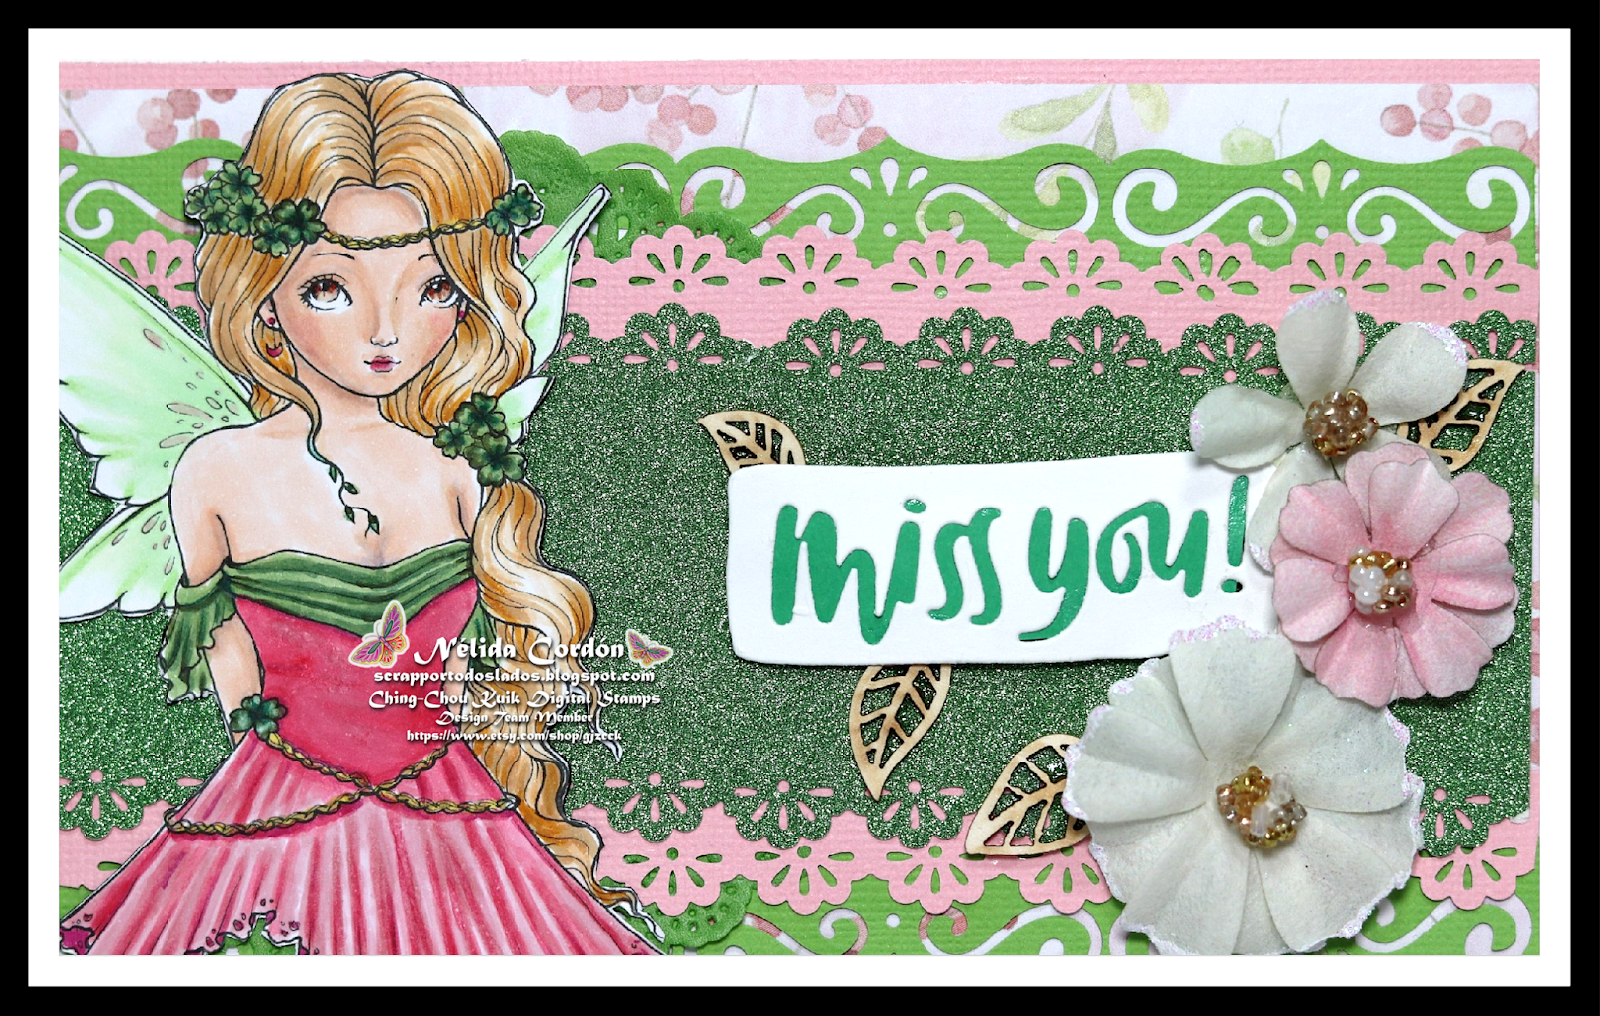
This week the DT members had to make a shaped card and I´ve made mine with the image called "Love Parrot" that can be found HERE
La imagen se llama "Love Parrot" y la podéis encontrar AQUÍ.

Las combinaciones de Copic con las que he coloreado el digi son las siguientes:
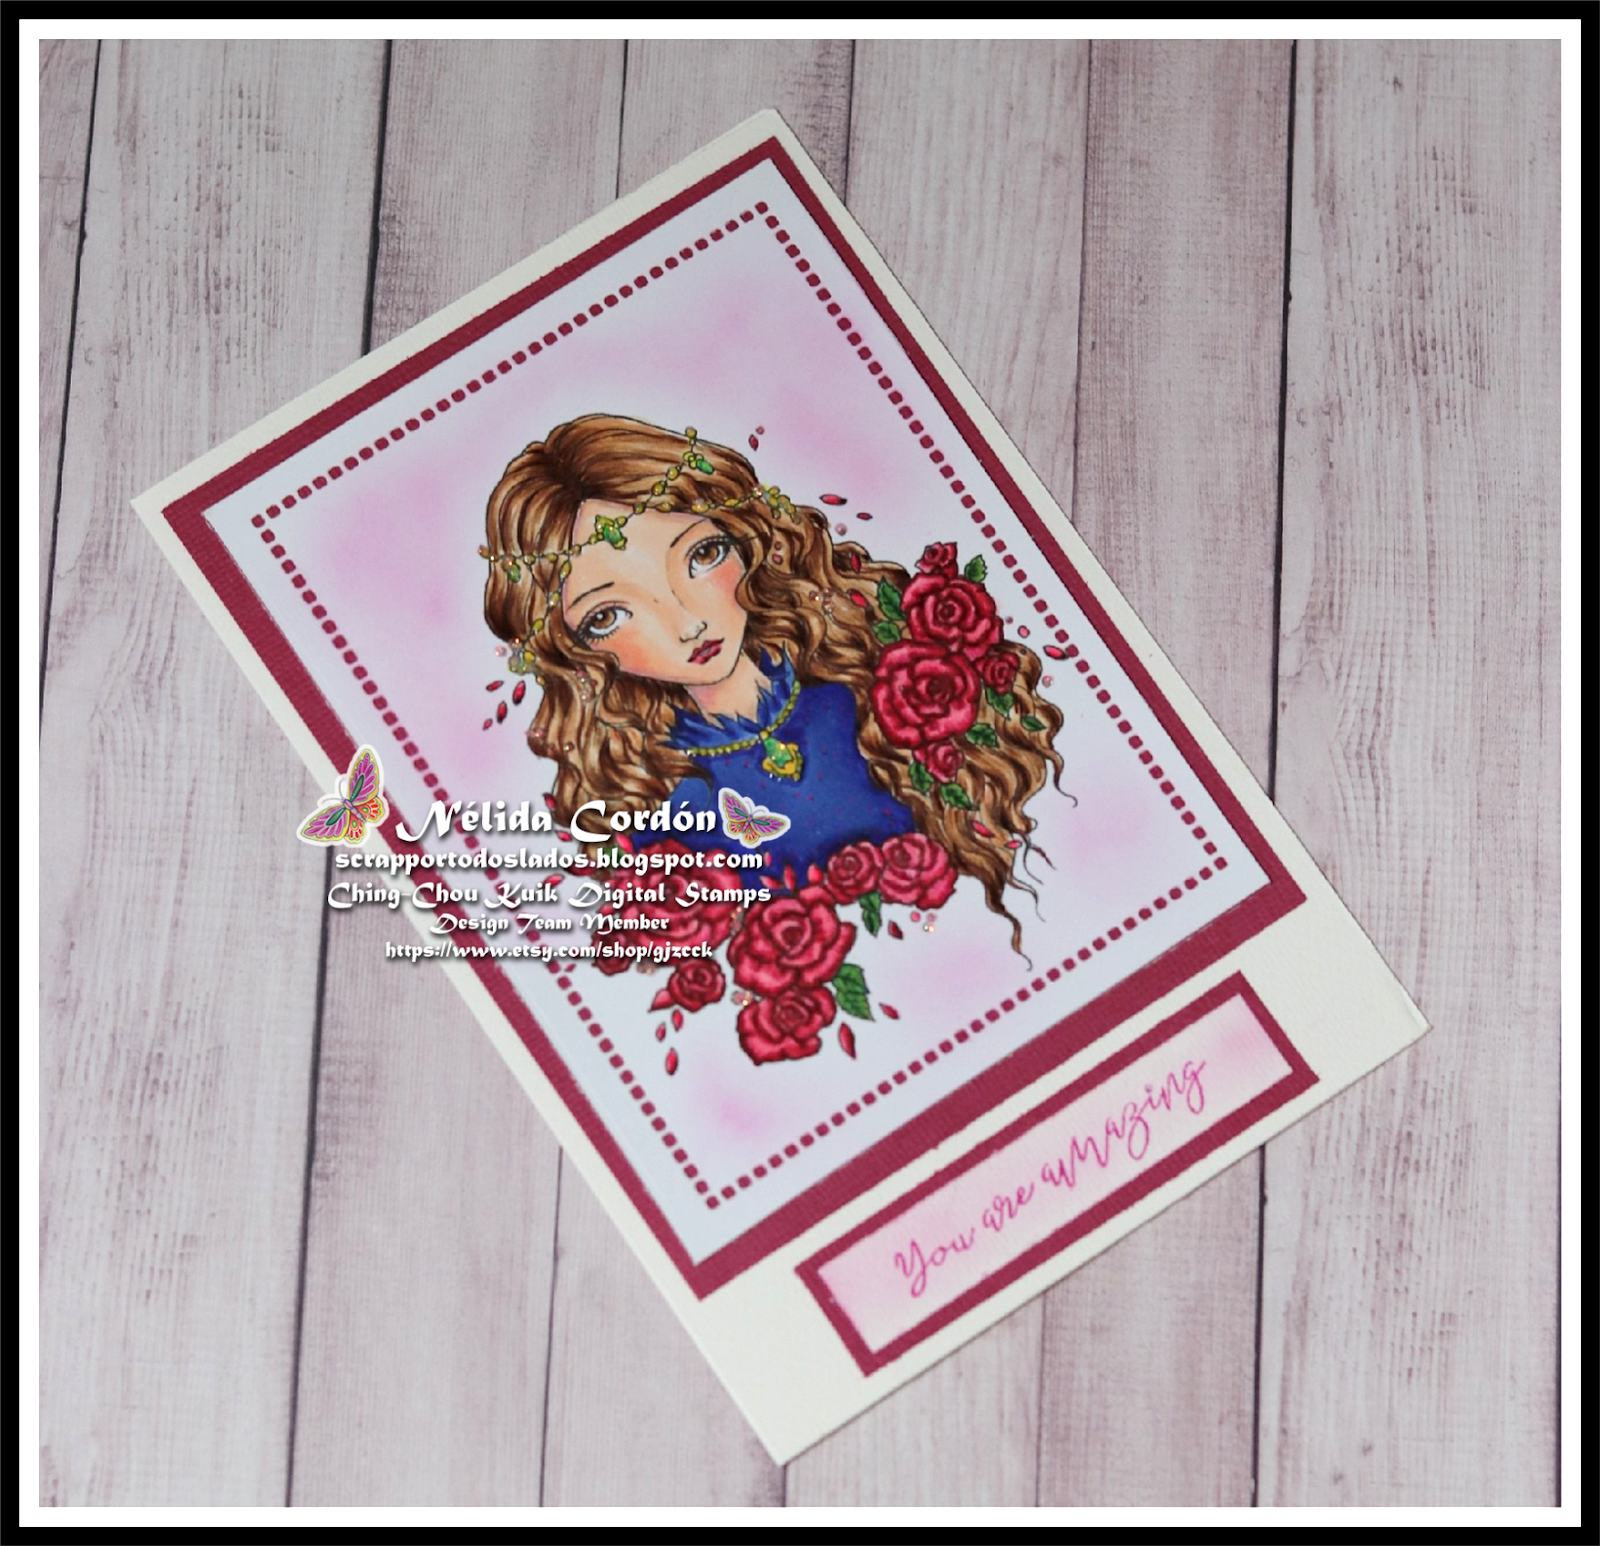
The Copic combinations are as follows:
-Piel/Skin:V22,E11,E21,E00,E93
-Cabello/Hair:R81,R83,R85,RV10
-Alas/Wings:BG45,BG000,BG32,BG11
-Loros/Parrots:B29,B45,Y06,Y02,100,E07,Yr09,Y19,E99
-Flores/flowers:R81,R83,R85
-Hojas/leaves:G00,G03,G05
Una vez coloreada, recorté la imagen y comencé a realizar la base con un troquel de Spellbinders y una cartulina blanca texturizada.
Once I coloured the digi, I cut it and I started to make the card base with a Spellbinders die and a white textured cardstock.
Como el troquel es un set, utilicé el mismo y el siguiente más pequeño para  crear un marco con la colección de papeles Maui de Mintopia, que es una preciosidad.
Due to this die is from a set, I´ve used the next small one with the one used for the base to make a frame with the Mintopia paper collection called Maui (it´s gorgeous!)
Coloqué un papel decorado de la misma colección encima de la base  blanca y sobre él el marco.
Entre la imagen y el marco, varios troquelados (también de Maui).
Between the image and the frame, I placed some die cuts from the Maui collection too.
El sentimiento "for you" (para ti ) es de un set de sellos de Spellbinders estampado conVersafine negro.
The sentiment "for you" is from a Spellbinders stamp set with black Versafine.
Eso es todo, muchas gracias por vuestras visitas, nos "vemos" pronto.
That´s all for me, thank you so much for your visits, and I´ll "see"  you soon.


Un abrazo y cuidaros mucho
Hugs and take care

Me gustaría presentarme a los siguientes retos:
I would like to join these challenges:
-Crafty Creations Challenges-#409 (Anything goes)
-Polkadoodles Craft Challenge week 21 (Anything goes)

sábado, 16 de mayo de 2020

Ching Chou Kuik: Poppy Fairy

Hola:
Hello everyone:
Nueva entrada con mi trabajo de inspiración semanal para el reto de Ching Chou Kuik, cuyo tema tiene este mes;
I´m here today with my new inspiration project for the current challenge at Ching Chou Kuik challenge blog, which theme is:
En cuanto al requisito para el DT de esta semana, teníamos que utilizar brillo, ya fuese a través de purpurina o polvos o lo que fuese.
Regarding the DT members, this week the requiremet for our creations was to make a sparkle one (with glitter, powders or something)
En mi caso, he utilizado bolis de gel y mi inseparable Stickles en tono Diamond de Ranger para hacer a esta bonita hada un brillante vestido azul.
In my case, I´ve used gel pens and my "must use", Stickles (Diamond tone) to make this pretty fairy with a beautiful blue sparkly dress.

La imagen, llamada "Poppy Fairy" (hada de amapola) y que podéis encontrar AQUÍ está coloreada con rotuladores Copic en las siguientes combinaciones:
The image, called "Poppy Fairy" and that can be found HERE is coloured with Copic markers in the next combinations:
-Piel/skin: V20, E11,E21,E00,E000, E93
-Cabello/hair:Y21,Y23,YR24,E97
-Rojos/reds:R35,R37,R39,R32
-Azules/blues:B32,B34,B37,B39
El vestido lleva bolígrafos de gel blanco, azul calro, azul oscuro y Stickles de Ranger en tono Diamond.
The dress is also made with white and blue gel pens and Stickles from Ranger (Diamond)
-Alas/wings: BV10,BV11,BV13,YG20
Una vez recortada la imagen, realicé desde cero un cuaderno de 4 por 5 y medio pulgadas. Con dos tapas de cartón forradas con papel decorado de la colección de Fabrika Decoru "Magestic Iris" y encuadernados con folios blancos por medio de un wiro blanco con mi Cinch.
Once I cut the image, I made a notebook from scrath (4x5,5 inches), bound it with my Cinch and two cardboard covers and the Fabrika Decoru paper collection "Magestic Iris".
Colgado del wiro hay una cadenita blanca con una tassel o borla azul.
Hung in the wiro binding there´s a white little ball chain with a blue tassel.
Todos los bordes están entintados con Distress Ink.
All the borders are inked with blue Distress Ink.
En las esquinas de la cubierta hay unas esquineras metálicas.
There are metallic corners.
Además, he utilizado pasta de textura mezclada con Perfect Pearls rojos a través de un stencil de texto de "Todo Stencil"
Besides, I´ve used some texture paste mixed with red Perfect Pearls through a texted stencil from "Todo Stencil"
Como últimos detalles, una cinta roja de raso y una piedra de strass también roja.
The last details, a red stain ribbon and a red rhinestone.
Espero que os haya gustado la libreta, muchas gracias por vuestras visitas y nos "vemos" pronto.


sábado, 9 de mayo de 2020

Ching Chou Kuik: Spring Lilies

Hola a todos:
Hello everyone:
Ha comenzado el reto del mes de mayo en el blog de retos de Ching Chou Kuik con tema:
A new challenge has just started at Ching Chou Kuik challenge blog, which theme this time is:

Como proyecto de inspiración, he elegido hacer una tarjeta con una de sus preciosas imágenes nuevas, llamada "Spring Lilies" (Lirios de Primavera) que podéis encontrar AQUÍ.
As my inspiration project, I´ve decided to make a card with a beautiful new image called "Spring Lilies" that can be found HERE
La he coloreado con rotuladores Copic en las siguientes combinaciones:
I´ve coloured her with Copic markers with the next combinations:
-Piel/SkinV22,E11,E21,E00,E93
-Cabello/Hair:E51,E53,E13,E17,E97
-Vestido/dress:RV11,RV13,RV14,RV17
-Azules/blues:B91,B93,B95,B97
-Lirios/lilies:Y15, R89,R37,R35,R32,YG63,YG67
-Fondo/background: BV10,R00,0 (blender)
 Un vez coloreada la imagen y el fondo, lo corté a las medidas deseadas y monté el panel sobre una bonita cartulina texturizada mint.
Once I´ve coloured the image and the background, I cut the panel and placed it on a nice textured mint cardstock.
Después utilicé una carpeta de texura de líneas diagonales para darle relieve (a través de embossing frío) a una cartulina texturizada aqua. La monté sobre otra de color mint y todo sobre una base de aqua.
After that, I used a texture folder of diagonal lines to give some texture (that would be the dry embossing) on an aqua cardstock. I placed it on another mint cardstock and all this on an aqua card base.
Entre la base  la cartulina con el embossing, coloqué una cinta con lentejuelas que lleva una flor hecha a mano y coloreada con tintas y rotulador (ademá de unos toques de Stickles de Ranger en tono Diamond).
Between the base and the cardstock with the emobossing I placed a lace with sequins with a handmade flower on  (coloured with inks, markers and touches of Diamond Stickles)-


En cuanto al sentimiento, "happy birthday", es un troquelado hecho en cartulina azul con un troquel de Lawn Fawn.
Regarding the sentiment, the "happy birthday", it´s a die cut made with a blue cardstock and a Lawn Fawn die.
Eso es todo, creo que en un diseño sencillo pero elegante, a juego con la imagen.
That would be all for today, a simple but classy design matching the elegance of this image.

Muchas gracias por vuestras visitas, cuidaros mucho y nos "vemos" pronto
Thanks a lot for your visits, take care and I´ll "see" you soon.
Un abrazo
Hiugs
Me gustaría presentarme al los siguientes retos:
I would like to enter the next challenges:

sábado, 18 de abril de 2020

Ching Chou Kuik: Boston Terrier

Hola a todos:
Hello everyone:
Vengo a enseñaros mi segunda tarjeta de inspiración de este mes de abril para el blog de retos de Ching Chou Kuik, que este mes tiene un tema en el que los protagonistas son nuestros amigos peludos:
I´m here today to show you my second inspirational project for the current challenge at the Ching Chou Kuik challenge blog, which theme is:
La imagen, llamada "Boston Terrier" y que podéis encontrar AQUÍ, está coloreada con rotuladores Copic, y tiene detalles de Stickles de Ranger (tono Diamond) en el vestido y en la diadema de la chica.
The image I´ve chosen to make this card is a lovely one called "Boston Terrier" that can be found HERE
El fondo está entintado con tinta Distress Ink (Tattered Rose).
The background and corners are inked with Tattered Rose Distress Ink.
Una vez terminado el panel, utilicé un troquel de Tim Holtz que corta con las medidas de ATC, para cortarlo y lo monté sobre  una cartulina texturizada rosa fuerte (redondeando sus bordes).
Once the panel with the image was made, I used a Tim Holtz die to make an ATC with the image, and I placed it on top of a pink textured cardstock, (with the corners rounded.
Así que en realidad, to que tenemos es un ATC montado sobre una tarjeta.
So, in fact, this project is an ATC on top of a card.
La base de la tarjeta, blanca sin texturizar, tiene un par de papeles decorados y sobre ellos un chipboard en forma de marco.
The white cardbase, with no texture, has two decorated paper on top, and a chipboard with a frame shape.
Sobre este marco he puesto una blonda verde a juego con los ojos de nuestros personajes y unos die cuts florales (sobre ellos, el ATC con la imagen).
On the frame I´ve placed a green doily, matching the eyes of both the terrier and the girl, and some floral die cuts. On top of all these elements, the ATC with the image.
El sentimiento, "have faith in yourself and in the future" (ten fe en ti mismo y en el futuro) es una pegatina.
The sentiment, "have faith in yourself and in the future" is a sticker from a Scrapbook paper collection.
Entre la base y los papeles decorados hay un encaje negro.
Between the base and the decorated papers there´s a black lace on the right side.
Terminan los detalles del diseño dos piezas metálicas (una flor y una llave) y  tres perlas verdes.
Two metallic elements and three green pearls finish the design.

Espero que os haya gustado y recordaros que si este mes participáis en el reto de CCK, recibiréis una de sus bonitas imágenes, concretamente, ésta:
I hope you like my card, and before I leave, I would like to remind you that there´s a beautiful freebie for everyone who join us in this monthly challenge (or at the Facebook one):


Muchas gracias por vuestras visitas, nos "vemos" pronto.
Thank  you for your visits, I´ll "see" you soon.
Un abrazo
Hugs

sábado, 11 de abril de 2020

Ching Chou Kuik: Sakura in March

Hola a todos:
Hello everyone:

Ha comenzado nuevo reto en el blog de retos de Ching Chou Kuik, que tiene de tema en esta ocasión:
There´s a new challenge at Ching Chou Kuik challenge blog, which theme is:
Para mi trabajo de inspiración he hecho un tag con base de madera y una preciosa imagen llamada "Sakura in March".
For my inspiration project I´ve made a wood tag with a beautiful image called "Sakura in March" that can be found HERE
La verdad es que es una preciosidad y seguramente vuelva a colorearla con otros tonos
I really love this image and I will probably colour it again with other colour combinations.
Una vez coloreada la imagen,la recorté y comencé a trabajar en el tag.
Once the image was coloured, I cut it and started to design the wood tag.
Lo primero que hice fue pegar un papel decorado de una colección de Stamperia y entinté todos los bordes con Distress oxide.
First, I glued a decorated paper from a Stamperia collection and inked the borders with Distress Oxide.
Luego utilicé para el diseño otros papeles decorados y un troquel y pegué la imagen encima con las alas en relieve con ayuda de cuadrados autoadhesivos de foam, como podéis ver en la siguiente foto.
Then, I used other decorated papers from a Kora Project collection (Hello Sprig) and a die cut and placed the image on top, giving volume to her wings with 3d foam squares, as you can see in the next photograph.
También podéis observar que las alas tienen toques de Stickles de Ranger en tono Diamond (como todos mis trabajos).
You can see that the wings have touches of Sitckles from Ranger (Diamond) like all my creations.
En la parte inferior izquierda coloqué un bouquet con flores de Prima y algunas hechas por mi, además de un par de perlas en forma de rosas grises (también hay alrededor de la imagen unas pequeñas perlas rosas).
At the bottom left corner I´ve placed a flower bouquet from Prima and some paper handmade flowers and grey rose-shaped pearls. There are also some little pink pearls surrounded the image.

Para terminar con el tag, un pequeño banderín negro haciendo contraste y unas cintas atadas a través del agujero del tag.
To finish the design, a little black pennant to give contrast and some ribbons tied through the tag hole.
Eso es todo, muchas gracias por vuestras visitas y nos vemos pronto.
That would be all, thank you for your visits, and I´ll "see"  you soon.


viernes, 20 de marzo de 2020

Ching Chou Kuik: Green Clover

Hola a todos:
Hello everyone:
 Espero que estéis bien y que la cuarentena no se esté haciendo excesivamente pesada.
Hoy os escribo para enseñaros mi último proyecto de inspiración para el reto vigente en el blog de retos de Ching Chou Kuik, cuyo tema es:
I really hope you are all OK and the quarantine is not too tough.
Today I write to you to show you my latest inspiration project for the current challenge at the blog which theme is:
EASTER/FLORAL

Esta semana el Equipo de Diseño tenía como requisito usar muchas capas y yo he elegido hacer una tarjeta con una imagen llamada "Green Clover" (trébol verde) que podéis encontrar AQUÍ
This time the Design Team members had to use lots of layers in the projects, and I´ve chosen  to make a card with an image called "Green Clover" that can be found HERE

La imagen está coloreada con los rotuladores Copic en las siguientes combinaciones:
The image is coloured with Copic markets with the next combinations:
-Piel/Skin:E93,V20,E21,E11,E00,E000
-Cabello/hair:YR20,E53,E55,YR24
-Ojos/eyes:E17,E15,E13,E41
-Vestido/dress:RV11,RV14,RV13,RV17
-Alas/wings:RV10,blender,G43
-Tréboles/clovers:G43,G46,G99

Una vez terminada de colorear, la recorté y comencé con el diseño de la tarjeta: Una base de papel de acuarela de alto gramaje, sobre la que coloqué una cartulina rosa texturizada y un papel decorado de la colección de Papers for You: Più bella acquarella.
Once the images was colourd, I cut it and started with the design of the card: a white card base made with a heavy weight watercolour paper, on top of this, a pink textured cardstock and a decorated paper from the collection Più bella Acquarella (Papers for You)
Sobre el papel coloqué varias capas de cartulina (verde, rosa y verde con purpurina)  que había anteriormente troquelado con distintos troqueles de bordes.
Then, I placed several layers of cardstock (green, pink and glittered green). You can see the borders of these cardstock, cut with several border puches.

También hay una blonda verde en el lado izquierdo de la tarjeta, aunque casi no se aprecia con las distintas capas de cartulina.
There´s also a green doily you on the left of the card, the sentiment "miss  you" and some Prima flowers with chipboard leaves from Kora Projects.
El sentimiento "miss you" (te echo de menos) y unas flores de Prima con unos chipboards en forma de hoja de Kora Projects terminan el diseño, que espero que os haya gustado.
Eso es todo de momento, muchas gracias por vuestras visitas y cuidaros mucho
That´s all, thanks a lot for your visits, please stay safe
Besos
Hugs


sábado, 14 de marzo de 2020

Ching Chou Kuik: Spring Bookworm

Hola a todos:
Hello everyone:
Hoy vengo con mi trabajo de inspiración semanal para el reto vigente en Ching Chou Kuik, cuyo tema es:
Time to show you my weekly inspiration project for the current challenge at Ching Chou Kuik challenge blog, which theme is:
PASCUA/FLORAL
EASTER/FLORAL

Esta semana el Equipo de Diseño tenía como requisito utilizar un técnica llamada "Spotlighting", que consiste en delimitar un espacio de la imagen y colorear sólo ese espacio, de modo que se destaca únicamente una zona.
The DT members had to use the "Spotlighting" technique, only colouring an area of the image.
Para mi proyecto he elegido un sello llamado "Spring Bookworm" (algo así como ratón de biblioteca de Primavera), la cual podéis encontrar AQUÍ
For my project I´ve chosen an image called "Spring Bookworm" that can be found HERE.
Elegí un troquel en forma de rectángulo y lo marqué con lápiz en una primera impresión, siendo esta rectángulo el que coloreé con rotuladores Copic.
I chose a rectangle die to mark the area I wanted to colour in a first printed image and coloured it with Copic marker.
Después troquelé la zona coloreada con el mismo troquel rectangular y monté este panel sobre una cartulina verde texturizada.
After colouring, I die cut  the area with the same rectangle die and placed this panel on a green textured cardstock.
Utilicé para la base de la tarjeta una cartulina de alto gramaje de un blanco roto y sobre ella coloqué cartulina texturizada verde y una segunda impresión de la imagen, ésta sin colorear.
Sobre esta segunda impresión, estampé con tinta Versamark y polvos de embossing dorado el sentimiento "Especially for you" .
I used an off- white heavey weight cardstock for card base, on which I placed another green textured cardstock and a second printed image (with no colour) where I stamped the sentiment (Especially for you) with Versamark ink and golden embossing powder.
Tanto el fondo de la imagen destacada, como el fondo de la imagen que permanece sin color, están entintados con tintas Distress Oxide
Both the background of the coloured image and the background of the no coloured image are inked with Distress Oxide.

El último paso fue hacer un marco dorado con pegamento Tombow y los Nuvo gilding flakes (láminas de oro muy finas).
The last step was to make a simple golden frame with Tombow glue and Nuvo gilding flakes.
Y hasta aquí mi sencilla tarjeta, muchas gracias por vuestras visitas y nos "vemos" pronto.
And here it is! My first card with the Spotlighting technique.
Thanks for stopping by today, I¨ll "see"  you soon.


sábado, 7 de marzo de 2020

Ching Chou Kuik: Rose

Hola a todos:
Hello everyone:

Un nuevo reto ha comenzado este mes de marzo en el blog de retos de Ching Chou Kuik con el tema:
A new challenge has just started at Ching Chou Kuik challenge blog, with the topic:


Para mi trabajo de  inspiración he utilizado una preciosa imagen llamada "Rose" que forma parte de un set, concretamente "Flora y Fauna 1" y que podéis encontrar AQUÍ
For my inspiration project I´ve used a beautiful imagen called "Rose" from the "Flora and Fauna" set 1 that can be found HERE


Me pareció una imagen tan bonita, que la verdad es que después de coloreada, pensé que la tarjeta no necesitaba mucho más adorno que esas impresionantes rosas, así que  el diseño es bien sencillo:
Una vez coloreada la imagen con rotuladores Copic  y algunos detalles de rotuladores de gel (en el vestido), Stickles de Ranger (tono Diamond) y Nuvo Crystal Drops (clear) en las joyas, utilicé un troquel de Spellbinders (nueva adquisición) para troquelar el panel con ese calado de pequeños cuadrados.
Once the image was coloured with Copic markers (and some details on the dress with Gel pen, besides Stickles and Nuvo Crystal drops on the jewellery), I used a Spellbinders die to die cut the panel with the frame made with little squares  that you see at the picture.

En cuanto al fondo, lleva ligeros toques con cepillo de tinta Distress.
Regarding the background, it´s made with some soft touches of Distress Ink and a brush.

La base de la tarjeta es papel de acuarela de alto gramaje, al que coloqué una cartulina texturizada con la imagen encima y otra más pequeña del mismo tono con el sentimiento encima, estampando un sello de Amelie con la frase "you are amazing" (eres increíble).
The card base is watercolour paper, on top of which I placed a textured cardstock, same one I placed under the sentiment, a "you´re amazing" stamped with Memento.
Espero que os haya gustado y que os deis una vuelta por la tienda de Etsy de Ching Chou Kuik para que veáis que maravillas dibuja.
That´s all, I hope you like my card and if you wish, you can have a look at Ching Chou Kuik Etsy store, and see the wonders she draws

Thanks a lot for your time, "see"  you soon.
Gracias por vuestras visitas, nos "vemos" pronto


sábado, 22 de febrero de 2020

Ching Chou Kuik: Purple Balloon

Hola a todos:
Hello everyone:
Hoy tengo doble entrada, lo que no resulta muy habitual, pero bueno, sarna con gusto no pica y me encanta publicar mis trabajos.
I´m here today with my weekly inspiration project for the current challenge at the Ching Chou Kuik challenge blog.
En ésta os quiero enseñar mi último trabajo de inspiración para el reto actual de Ching Chou Kuik, cuyo tema es:
This time the topic is:

En esta ocasión he decidido hacer una sencilla y cuca tarjeta con una de las nuevas imágenes de CCK, llamada "Purple Balloon" que podéis encontrar AQUÍ
I´ve made a simple and cute card with one of the new CCK images called "Purple Balloon" that can be found HERE
 La imagen está coloreada con rotuladores Copic en las siguientes combinaciones:
The image is coloured with Copic markers with the next combinations:
-Piel/skin:E04,E11,E21,R20,E00,E93
-Cabello/hair:Y23,YR21,Y26,YR24,E99
-Vestido/Dress: B91,B93,B95,B97,B99
-Ojos/eyes:BV20,BV23,C5,blender
-Globo, lazo, labios/Balloon, ribbon, lips:R20,R22,RV25
-Fondo/background:V000,R20,Blender,G00

Una vez coloreada la imagen, troquelé el panel con un troquel de Spellbinders en forma de punto de libro, le coloqué un lazo de raso rosita claro y lo puse encima de cartulina craft.
Después lo pegué a la base de la tarjeta, que es una cartulina también rosa claro con un brillo satinado muy bonito (de hecho, esta cartulina se llama "Polvo de Estrellas" y es de la marca Yosoyscraper@
Once the image was coloured, I cut the panel with a Spellbinders die of a bookmark, placed a little satin and pink ribbon and then, I placed the panel on top of a craft cardstock.
Then, I glued all to the card base, made with a pink cardstock with a soft glimmer, from Yosoyscraper@ called "star dust".


Después, en la parte derecha de la base, que quedaba vacía sin la imagen, coloqué un troquelado vegetal hecho en papel decorado con otro troquel de la marca Spellbinders y encima un chipboard de Kora.
On the right  of the base, I placed a die cut made with pink decorated paper and on top of this, a chipboard from Kora.
Lo último fue el sentimiento, un pequeño rectángulo con la frase "all you need is love" (todo lo que necesitas es amor) de una colección de Simple Stories y que, como podéis ver, también está montado sobre cartulina craft y tiene una pequeña piedra de Strass azul.
The last element of the design was the sentiment, a little rectangle with the "all you need is love" from a Simple Stories collection, also placed on a craft cardstock and with a blue rhinestone.

Eso es todo hasta la tarde que me ponga con la segunda entrada del día. Muchas gracias por vuestras visitas, nos "vemos" pronto.
That´s all for me but just for a while because I have to write another entry today. Thank  you so much for your visits, Ill "see" you soon.
Besos
Hugs

sábado, 15 de febrero de 2020

Ching Chou Kuik: Love in Spring

Hola a todos:
Hello everyone:

Hoy os enseño el segundo trabajo de inspiración para el blog de retos de Ching Chou Kuik, cuyo tema este mes de febrero no es otro que:
I´m here today to show you my second inspirational project for the current challenge at Ching Chou Kuik challenge blog, which theme is

En esta ocasión he decidido hacer una pequeña libreta con tapas de cartulina craft, con un pequeño lomo de un centímetro, con dos agujeros a los extremos por los que pasa un cordón elástico que se anuda en el interior de un pliego de hojas (a través del cordón he atravesado unas perlas)
This time I´ve decided to make a little notebook from scratch with the covers made with craft cardstock (4X6 inches) with a spine of a quarter of an inch, and two holes with golden eyelets made with the Crop a Dile. Through the holes there´s an elastic string  tied  holding some sheets.

La preciosa imagen se llama "Love in Spring" (amor en primavera) y la podéis encontrar AQUÍ.
The beautiful image is called "Love in Spring" and can be found HERE
Está coloreada con rotuladores Copic en las siguientes combinaciones:
It´s coloured with Copic markers with the next combinations:
Piel/skin:V01,E93,E00,E21,E11
Labios/lips:R05,R24,
Ojos/eyes:B63,B66,BV13
Cabello/hair:E30,E31,YR24,E97
Ramitas/little branches:E59,R22,R05,R24
Vestido/dress:B63,B66,BV13
Alas/wings:R22,RV10,B63,Y02,YG21, Stickles (Diamond)
Girasoles/sunflowers:G99,E59,E55,E35,Y23,Y26,Y04
Pájaros/birds!,B63,B66,B02,Y02

En cuanto al fondo, está coloreado con algunos rotuladores Copic (YG21,RV10,R00,blender) y con tintas. Después utilicé un stencil con formas de craqueladuras sobre el que apliqué tinta Distress Oxide Worn Lipstick.
Regarding the background, It´s coloured with some Copic markers (YG21,RV10,R00, blender) and some inks. Later, I´ve used a stencil with crackle shapes and Distress Oxide Worn Lipstick.
También pegué con Tombow unos copos dorados de Nuvo (Nuvo Gilding Flakes)
Troquelé el panel con un troquel de Spellbinders y lo coloqué sobre la portada de la libreta en la que había pegado anteriormente una cartulina texturizada azul y un papel decorado de la colección Elegance de Papers for  You.
I also glued with Tombow some Nuvo Gilding Flakes.
Then, I cut the panel with a Spellbinders die and it was placed on the cover where I had glued previously a blue texture cardstock and a decorated paper from a Papers for You collection called Elegance
Elegí dos chipboards de Kora Projects con forma de ramita de flores y los coloreé a juego con las ramitas que salen en la imagen.
I also used two Kora Project´s chipboards (branches of flowers) and painted them matching the branches of the image.
El último detalle es el cartel de "Valentine" troquelado con un set de la Pareja Creativa, encima de un pedazo de cartulina azul texturizada, es de una colección de Graphic 45
The final detail is the title "Valentine" from a Graphic 45 collection and a die from Spellbinders.


Eso es todo por hoy, espero que os guste mi pequeña libreta, muchas gracias por vuestras visitas, nos "vemos" pronto.
That´s all for me until next week, I hope you like my notebook, thanks a lot for your visits, and I´ll "see"  you soon.

sábado, 8 de febrero de 2020

Ching Chou Kuik: Love Balloon

Hola a todos:
Hello everyone:

Momento de enseñaros mi nuevo trabajo de inspiración para el reto vigente este mes en el blog de retos de Ching Chou Kuik.
Time to show you my latest inspiration card for the current challenge at the Ching Chou Kuik challenge blog.
En esta ocasión el tema es:
This time the topic for the challenge is:
He elegido hacer una tarjeta con una las nuevas imágenes llamada "Love Balloon"( globo de amor) y que podéis encontrar AQUI.
I´ve decided to create a Valentine´s card with one of CCK new images called "Love Balloon" that can be found HERE
Tanto la chica como el globo están coloreados con rotuladores Copic, aunque el globo lleva encima una capa de Glossy Accents. 
Both the girl and the balloon are coloured with Copic markers, although the balloon has a layer of Glossy Accents.
El fondo está hecho con distintas tintas y con polvos frantage, a los,cuales hay que aplicarles la pistola de calor por detrás para que se derritan.
The background is made with different inks and Frantage embossing powders (you have to melt these with the heat gun from behind)

Después de terminado el fondo, troquelé el panel con un  troquel de rectángulo festoneado con falso cosido de La Pareja Creativa.
After finishing the background, I cut the panel with a scalloped rectangle die from La Pareja Creativa
La base de la tarjeta es un papel de acuerela de alto gramaje, sobre el que he puesto una cartulina texturizada azul muy clarito y unos papeles de Stamperia (uno troquelado el borde superior con un troquel de bordes).
The cardbase is a heavyweight watercolour paper, on top of which I´ve placed some decorated paper from Stamperia with the borders inked with Worn Lipstick Distress Ink.
Los bordes están envejecidos con tinta Distress Worn Lipstick.
Dentro del panel, rodeando a la imagen, varias "notas de  amor" son de la colección "Love and Adore" de Simple Stories.
In the panel, surrounding the image, several "love notes" from the "Love and Adore" collection by Simple Stories.
El sentimiento es una maderita coloreada con Copic y con una capa de Stickles de Ranger en tono Diamond.
The sentiment is a wooden word coloured with Copic and with a layer of Stickles from Ranger (Diamond tone).

Por último, un corazón de papel acompañando al sentimiento.
The last detail is the paper heart next to the sentiment.
Eso es todo por hoy, espero que os haya gustado, muchas gracias por vuestras visitas, nos "vemos" pronto.
That´s all for me today, I hope you like my Valentine´s card, thanks for your visits, I´ll "see" you soon.

Besos
Hugs

sábado, 25 de enero de 2020

Ching Chou Kuik: Seashell

Hola a todos:
Hello everyone:
El reto de enero en CCK está a punto de terminar, pero todavía tenéis unos días para presentaros.
Recordad que el tema era:
The current challenge at CCK is coming to an end, but there are still some days left to join us.
Remeber that the topic this time is:

Mi última entrada de inspiración para ese mismo reto  es una tarjeta hecha con una imagen llamada "Seashell" y se trata de una bella sirena que podéis encontrar AQUÍ.
My last inspiration post for this challenge is made with an image called "Seashell" which is a beautiful mermaid that can be found HERE.

¿Y por qué sirenas, si no es verano? Porque esta semana el equipo de diseño fue retado a usar una criatura mitológica y no pude desaprovechar la oportunidad para pintar esta belleza que me enamoró desde que la vi:
And why am I using mermaids in Winter? Because the DT members were challenged this week to use a Mythical creature so I had the chance to colour this gorgeous I fell in love with.

Está coloreada con rotuladores Copic con las siguientes combinaciones:
Seashell is coloured with Copic markers with the next combinations:

-Piel/Skin:V20,E11,E21,E00,E93,YG03,E000, Diamond Stickles
-Cabello/hair:E53,E97,E99
-Labios/lips:RV42,R22
-Ojos/eyes:B02,B06
-Cola/top/tail/top:B00,B02,B04,B06, RV11
-Estrella de mar/starfish:RV42,R22,R05
-Caracola/conch shell:boli de gel blanco,white gel pen R22,E17,blender,RV42, marrón Polychromo,Polychromo brown
-Conchas/shells:Y28, boli de gel blanco,white gel pen, marrón Polychoromo,brown Polychromo
Las perlas están hechas con gotitas de Liquid Pearls White Opal
The pearls are made with little drops of White Opal Liquid Pearls

Vamos ahora si os parece a ver la tarjeta en su totalidad:
Let´s go with the final card:
 
La base de dicha tarjeta está hecha con papel de acuarela de alto gramaje, sobre la que he colocado un papel decorado de la colección de Amelie, Sirenas.
The card base is made with heavyweight watercolour papel, on top of which I´ve placed a decorated paper from an Amelie collection called "Sirenas"
Sobre éste, una cartulina texturizada azul, a juego con la imagen y un precioso papel decorado de la colección Maui de Mintopia.
On top of this paper, I´ve placed a blue textured cardstock matching the mermaid, and on top of the cardstock another decorated paper, this time from Maui (Mintopia).

Encima, otro papel decorado de Maui, troquelado con un troquel de Spellbinder y un chipboard coloreado con Copic B05 y Diamond Stickles.
Then, another paper with the Maui collection die cut with a Spellbinders die and a chipboard coloured with Copic B05 and Diamond Stickles.

Encima de todo el conjunto, coloqué la sirena, una vez coloreada y recortada, con cuadrados autoadhesivos (3d foam).
The next step was to cut the mermail, once coloured and place it on the card with 3D foam squares.

Para terminar, el sentimiento es un sello de Amelie, estampado con tinta Versamark sobre la que eché polvos de embossing dorados.
I can´t forget the sentiment, an Amelie stamp with Versamark and golden embossing powders.

El mes que viene volveré con más entradas de inspiración para las  preciosas imágenes de Ching Chou Kuik, muchas gracias por vuestro tiempo, nos "vemos" pronto.
Next month I will be back with more inspiration projects for Ching Chou Kuik, thank you for your time, I´ll "see" you soon.
Besos:
Hugs:
Nélida

sábado, 18 de enero de 2020

Ching Chou Kuik: Sweet Bunny

Hola:
Hello:


Hoy publico  mi entrada semanal para Ching Chou Kuik.
I´m posting today my weekly inspirational creation for Ching Chou Kuik
El reto vigente este mes en el blog  de retos de CCK  tiene como tema:
The current challenge at the CCK challenges blog is:

Esta semana, el DT tenía como requisito usar el color que menos nos guste.
This week the DT members were challenged to "use your least favourite colour"
A mi me encantan todos los colores, pero es cierto que, a la hora de elegir uno para colorear, el amarillo es siempre mi última opción.
I love all colous but when It comes to choose combinations, yellow is usually my last choice.
Es por ello que son los tonos que predominan en mi "goodie card" ( tarjeta para chuches), que tiene un pequeño lomo ( de un centímetro) y en su interior un bolsillo a cada lado para meter algunos detalles. Así, quiero agradecer a algunas compañeras que estas Navidades pasadas se acordaran de mi mandándome unos bonitos "christmas"
That´s the reason  of the predominance of yellow shades in my "goodie card" which has a little spine and two pockets inside for some goodies (crafty goodies I mean). This way I would like to thank some crafty friends for their Christmas cards.
La imagen que he utilizado esta vez se llama "Sweet Bunny" y la podéis encontrar AQUI
The image I´ve chosen to work with is called "Sweet Bunny" and can be found HERE

Una vez coloreada, recorté el panel y troquelé con un troquel de bordes el lado superior e inferior y apliqué a todos ellos Stickles de Ranger.
Once the image was coloured, I cut the panel and used a punch border to punch the top and the bottom ones and I applied Stickles of Ranger.
El fondo esta entintado con Distress Ink y unas gotitas de Stickles.
The background is inked with Distress Ink and some drops of Stickles.

Posteriormente monté el panel sobre varios papeles decorados y entintados con Distress Oxide y coloqué todo sobre la base de la tarjeta ( hecha con papel de acuarela de alto gramaje) a la que había colocado cartulina texturizada amarilla y le había hecho un cierre con unos agujeros con eyelets (Crop a dile) y una cadeneta de bolitas en la que he colocado un troquelado en forma de flor que pertenece a la colección Maui de Mintopia.
Lately I placed the panel on top of two decorated papers (inked with Distress Oxide) and I placed all on the top of the card base (made with heavyweight watercolour paper) in which I placed yellow textured cardstock and a close made with the Crop a dile and some eyelets, a key chain with a die cut from the Maui collection (Mintopia)
Unas esquineras metálicas terminan la estructura.
Some metallic corners finish the structure.
Al diseño únicamente le quedaba para acabar el sentimiento "thankful" ( agradecida) que está coloreado con Copic Y19 y entintado con Distress Oxide. Además de unas flores,unas de Prima y otras mías.
To finish the design, I placed the "thankful" sentiment coloured with Copic Y19 and inked with Distress Oxide. Besides, some flowers (mine and from Prima)

Eso es todo por hoy,muchas gracias por pasaros por aquí.
That´s all so far, thank you for stopping by today.
Nos"vemos" muy pronto.
I´ll "see" you soon.

Besos:
Hugs:

Nélida


sábado, 11 de enero de 2020

Ching Chou Kuik: Winter Snowflake

Hola:
Hello:

Me acerco hoy a saludaros y a enseñaros mi tarjeta de inspiración para el nuevo reto en el blog de Ching Chou Kuik, que durante este mes de enero tendrá como tema:
I´m here today to show you my latest inspirational card for the current challenge at the Ching Chou Kuik´s blog that this month is about:

(un trabajo, un bebe, e incluso nuevo material con el que crear)
(eg new home, new baby or new crafty stash)

Como tenía que hacer una tarjeta de cumpleaños para una compañera del DT y lo de año nuevo no creo que se refiriese a "cumplido" pues el requisito lo he seguido utilizando una nueva imagen de Ching Chou, que se llama "Winter Snowflake" y que podéis encontrar AQUÍ
I needed to make a Birthday card for a partner at the DT, so I chose to work with the new Ching Chou image o fulfill with the theme. This new image is called "Winter Snowflake" and can be found HERE

Francamente que me parece una preciosidad de imagen y ha sido un lujo colorearla con las siguientes combinaciones de Copic:
I truly think this is a gorgeous image and it´s been a pleasure to colour her with the next Copic combinations:
-Piel/Skin:E04,E11,E21,E93,E00,E000
-Cabello/Hair:E21,E23,E25,E27,E08
-Alas/Wings:Y11,BG13,BG11,BG10
-Vestido/dress:B02,B04,B00,RV66,RV55,RV52,Y11
Tanto el vestido como las joyas de la frente y la varita en forma de copo llevan Stickles de Ranger (Diamond)
At both the dress and the jewelry I´ve applied a layer of Diamond Stickles from Ranger.


Una vez coloreada la imagen, utilicé para hacer el fondo los mismos colores que las alas (así dan las mismas sensación de transparencia), aunque para el Y11, además del rotulador utilicé la recarga (Various Ink Refill).
Once the image was ready, I used to colour the background the same colours that I did at the wings, so it gives them a transparency look, although for the Y11 I used not only the marker but the Various Ink Refill.
Lo siguiente fue troquelar el interior del panel con un troquel de formar geométricas dos veces (una por la parte superior derecha y otra por la inferior derecha).
Aquí podéis ver ya montada la tarjeta:
The next step was to cut the inside panel with a geometric shapes die twice (once at the top right and the  other at the bottom right)
You can watch the complete designed card in the next picture here:
 La base es papel de acuarela de alto gramaje, sobre la que coloqué cartulina texturizada rosa.
El troquelado con el sentimiento y el propio sentimiento (Feliz Cumpleaños) son de un set de Spellbinders.
The card base is a heavyweight watercolour paper, on top of which I placed a pink textured cardstock.
The die with the sentiment and the stamp with the Happy Birthday itself are from a Spellbinders set.

Para terminar con el diseño, coloqué unas piedras de strass rosa a ambos lados de la frase y unas lentejuelas azules para equilibrar en el lado izquierdo.
To complete the card, I placed some pink rhinestones at both sides of the sentiments and several blue sequins at the left of the panel to balance the design.


 Espero que os haya gustado, agradeceros de nuevo vuestro tiempo, nos "vemos" pronto.
I hope you like my inspirational card, I would like to thank you once more for your time and support. 
I´ll "see" you soon.